Replacing the electric bicycle controller can seem tricky at first. But with the right tools and a clear plan, most riders handle it at home. This guide covers everything from picking a compatible part to testing your bike after the swap. You’ll learn safety tips, step-by-step instructions, and ways to avoid common pitfalls. Whether your controller failed or you want an upgrade, following these steps ensures a smooth ride ahead.
Featured Summary
This article provides a complete DIY guide to replacing an electric bicycle controller. It starts with basics like what the controller does and signs it needs replacement. Then, it explains how to choose the right one based on voltage and motor type. You’ll find lists of essential tools, key safety rules, and detailed steps for removal and installation. Testing tips, troubleshooting advice, and maintenance ideas round it out. With photos, lists, and a table, this resource helps beginners build skills while experts refine their process.
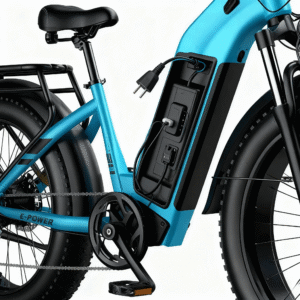
Understanding the E-Bike Controller

The electric bicycle controller acts as the brain of your ride. It manages power from the battery to the motor. It also handles speed, throttle input, and safety features like brake cut-offs.
What Does It Do?
This small box controls how much juice goes to the motor. It reads signals from the throttle or pedals. Without it, your bike won’t move electrically.
Signs of a Faulty Controller
Watch for sudden power loss or error codes on the display. If the throttle doesn’t respond smoothly, check here first. Overheating or strange noises often point to controller issues.
Recommended: Funhang Electric Bike Reviews | Affordable Amazon E-Bikes – Honest Take
Choosing the Right Replacement Controller
Picking the wrong part can damage your bike. Focus on matching specs to avoid problems. Research your bike’s model for best results.
Key Compatibility Factors
Voltage must match your battery, like 36V or 48V. Check amperage for motor power needs. Ensure it works with brushless or brushed motors.
Types of Controllers
Sine wave models run quietly and efficiently. Square wave ones offer more torque but can be noisy. Programmable options let you tweak settings.
| Controller Type | Pros | Cons | Best For |
|---|---|---|---|
| Sine Wave | Smooth, quiet operation | Higher cost | Daily commuters |
| Square Wave | Strong torque, affordable | Noisier ride | Off-road bikes |
| Programmable | Customizable settings | Needs tech know-how | Performance upgrades |
Recommended: Concord Electric Bike Reviews – Walmart’s Affordable Commuter E-Bikes Examined
Tools and Materials Needed
Gather these items before starting. Most are common household tools. A multimeter helps with testing.
- Screwdrivers (Phillips and flathead)
- Allen wrench set
- Pliers and wire cutters
- Electrical tape or heat shrink tubing
- Zip ties for wire management
- Multimeter for checks
- Soldering iron if connectors differ
- Masking tape and pen for labels
- Safety gloves and glasses
Having extras like thermal paste is smart. It aids heat transfer in the new unit.
Safety Precautions

Safety comes first when dealing with electrics. One wrong move can cause shocks or damage.
Always disconnect the battery fully. Work in a dry, well-lit space. Wear insulated gloves to protect hands.
Label all wires before unplugging. Take photos of connections. This prevents mix-ups later.
Avoid wet conditions entirely. If you see smoke, stop and unplug everything right away.
Recommended: Jasion Electric Bike Reviews
Step-by-Step Replacement Guide

Follow these detailed steps in order. Take your time, especially with wiring. Most swaps take 1-2 hours.
Prepare Your Workspace
Set up a stable bike stand. Remove the battery and press the power button. This drains any leftover charge.
Clear space for tools. Lay out a towel to catch small parts.
Locate and Access the Controller
Find the controller inside the frame or under the battery. Remove covers with screwdrivers. Cut old zip ties carefully.
Note how it’s mounted. This helps with the new install.
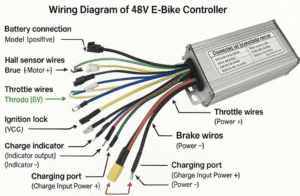
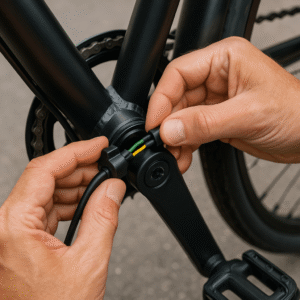
Disconnect and Label Wires
Photograph everything first. Label each plug with tape. Start with peripherals like throttle and display.
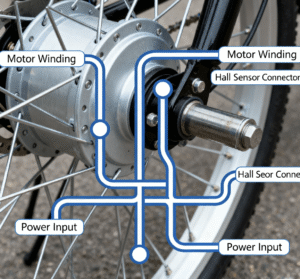
Unplug motor phase wires next. These are thick yellow, green, blue ones. Handle gently to avoid breaks.
Disconnect battery leads last. Always check polarity: red positive, black negative.
Remove the Old Controller
Unscrew brackets or bolts. Support the unit as you pull it out. Save hardware for reuse.
Inspect for damage like burns. This confirms the issue.
Install the New Controller
Dry fit the new one in place. Align holes and secure with screws. Apply thermal paste if needed.
Ensure good airflow around it. Heat sinks should face open air.
Reconnect Wires
Follow your labels and photos. Connect motor phases first. Match colors: yellow to yellow, etc.
Plug in sensors, throttle, brakes. Finish with battery leads. Tug gently to check security.
Use zip ties to bundle wires. Avoid pinching them.
Final Assembly
Double-check all connections. Replace covers loosely at first. This allows quick fixes if needed.
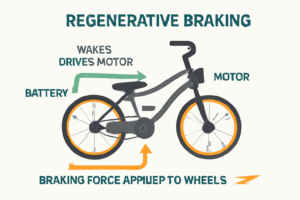
Recommended: Which Electric Bikes Have Regenerative Braking?
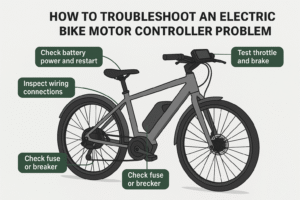
Testing and Troubleshooting
Power up slowly after reconnecting the battery. Watch for sparks or errors.
Basic Function Tests
Turn on the display. Test throttle for smooth spin. Check pedal assist by cranking lightly.
Squeeze brakes to confirm motor cut-off. Listen for odd sounds.
Common Issues and Fixes
If the motor runs backward, swap two phase wires. Error codes? Check the manual.
No power? Inspect connections with multimeter. Loose plugs are often the culprit.
Take a short test ride. Monitor heat and performance under load.
Common Mistakes and Tips
Many folks forget to label wires. This leads to wrong connections and frustration.
Don’t force plugs; they should click easily. If not, check alignment.
Tip: Use dielectric grease on connectors. It prevents corrosion in damp weather.
For upgrades, test in stages. Add one feature at a time.
Regular checks extend life. Clean dust and watch for loose parts.
Maintenance After Replacement
Keep your new controller happy with simple habits. Avoid overloading the bike.
Check wires monthly for wear. Ensure good ventilation to prevent overheating.
Store in dry places. Waterproofing spray helps if you ride in rain.
Upgrading related parts like batteries can boost performance. But match specs carefully.
This process builds your bike knowledge. With practice, it becomes second nature. Safe riding!