Executive Summary
Many folding e-bikes ship with a blunt control scheme: the throttle is locked to walk-assist only (~6 km/h) and the PAS (pedal assist) has a single, jumpy level that surges the moment you turn the cranks. Riders-especially beginners or family members-find this unnerving at low speed, on crowded paths, or when starting on hills.
This article shows how to replace the stock controller/display with an inexpensive, widely available KT (Kunteng) “power-graded” system to gain: (1) full-travel throttle in all PAS levels, (2) gentle multi-level PAS that limits current instead of chasing a fixed speed, and (3) minimal rewiring by reusing your existing cadence PAS and brake sensors. We also cover two upgrade branches-KT with open firmware and Cycle Analyst v3 architecture-for riders who want finer shaping later.

Who This Guide Is For
This guide targets owners of compact city folders using 36 V packs and 250-350 W hub motors who feel the bike “leaps” when PAS engages and whose throttles are restricted by the OEM. It also suits DIYers who want the cheapest reliable fix with the least wiring risk, as well as shop techs needing a repeatable conversion recipe.
Recommended: Funhang Electric Bike Reviews
Symptom → Root Cause
The Symptoms
- PAS Level 1 still surges from a stop; the assist comes on abruptly and feels twitchy in tight spaces.
- Throttle is capped to “walk assist,” refusing to provide normal acceleration.
- Display menus don’t help-key items are locked or buried, and changes barely affect feel.
Practical impact: new or cautious riders avoid the bike, hill starts feel stressful, and parking-lot maneuvers are jerky.
The Real Cause
- Speed-based PAS firmware. Each level targets a fixed wheel speed (e.g., L1 ≈ 15 km/h). The controller dumps near-max current until that speed is reached-same punch at L1 or L3-so starts feel identical and harsh.
- Vendor-locked throttle mapping. Many OEMs hard-limit throttle to a walk mode for regulatory reasons; the hardware can do more, but the firmware won’t.
- Power mismatch. A high-amp controller on a small hub magnifies each PAS pulse, making modulation at low speed difficult.
Key insight: The cadence PAS ring isn’t the problem. Controller logic is.
What We Want Instead (Success Criteria)
- Full-range throttle available in every PAS level.
- Power-graded PAS (levels cap current/watts rather than chasing speed), yielding soft, predictable starts.
- Minimal rewiring: reuse the existing cadence PAS and brake sensors when possible.
- Budget: roughly US $80-120 for controller + LCD, excluding tools/consumables.
Quick Decision Tree
- “I want the simplest, cheapest fix that works.” → KT controller + KT LCD (recommended baseline).
- “I want finer curves and ramp shaping later.” → KT hardware + open firmware (optional flash).
- “I want pro-level control, datalogging, torque/PAS blending.” → Cycle Analyst v3 + dumb controller (more wiring, $$).
Recommended: Concord Electric Bike Reviews – Walmart’s Affordable Commuter E-Bikes Examined
Solution Path A – KT “Power-Graded” Family (Recommended)
What KT Changes
KT controllers interpret PAS by current, not by target speed. Each level sets a current ceiling, so L1 can be truly gentle (e.g., ~60-120 W), L2 modest, and so forth. Throttle is configurable and can be enabled to work across all PAS levels. The effect is “tailwind-smooth” starts instead of “launch mode.”
On-bike feel after KT:
- Roll-away is progressive; balance at walking speed becomes easy.
- Hill starts don’t lurch; the motor ramps into torque.
- New riders regain confidence quickly.
Parts & Sizing
- Controller: KT, 36 V / 15 A is ideal for 250-350 W hubs (higher currents are possible but defeat the purpose).
- LCD: KT-LCD3 (feature-rich), LCD11 (compact), or LCD8H (color/compact). Choose a small screen for folders so it doesn’t snag when folding.
- Cables/Connectors: match your bike (JST-SM, Higo/Julet waterproof). Adapters exist but avoid long daisy chains.
Ordering checklist
- KT controller (36 V, sine wave if available, 6-MOSFET/9-MOSFET depending on space).
- Matching KT LCD (ensure model compatibility in the listing).
- Optional: crimp pins, JST shells, heat-shrink, spiral wrap, dielectric grease.
Wiring & Compatibility
KT typically supports 3-wire hall cadence PAS, 3-wire hall throttle, and 2-wire brake cutoffs. Most folders already use this pattern.
Steps
- Label OEM plugs (photo everything).
- Pinout sanity-check: 5 V (red), GND (black), signal (other color) on PAS/throttle. Some OEMs swap signal and 5 V; repin if needed.
- Motor phases (yellow/green/blue) and hall 6-pin connect directly; if rotation is wrong or rough, swap any two phase wires and match hall order accordingly.
Tip: Keep wiring short and strain-relieved; folding frames fatigue cables-add slack loops and anchor points.
Recommended: Are Electric Bikes Available for Purchase on Temu?
First-Boot Parameters (menu map)
(Names vary by LCD, but the logic is consistent.)
- Max battery current: start at 8-12 A for 250 W hubs (raise later if needed).
- Start current % / Start strength (e.g., C14): set 10-30% for gentle launch.
- Slow-start / Assist ramp: medium-soft (e.g., 3-5 on a 1-8 scale).
- Throttle in PAS: Enable full-travel throttle in all levels. Optionally allow throttle override at low speeds only.
- Speed limit: set legal cap (e.g., 25 km/h EU/32 km/h US class), separate from throttle mapping.
- L1-L5 current scale: make L1 ≈ 60-120 W, evenly step to your preferred L5.
Goal: Level 1 feels like a helpful push you can ride at walking speed without instability.
Road Test Protocol
- Stand test: wheel off ground, confirm smooth throttle sweep and PAS pickup without harsh jumps.
- Parking-lot test: start in L1, creep along a painted line; verify balance and fine control.
- Hill start: stop on a mild incline, launch in L1; raise start current slightly if it bogs, not surges.
- Thermal check: after a longer run, touch controller casing-warm is fine, hot suggests current too high or airflow too low.
Solution Path B – KT with Open Firmware (Optional Upgrade)
Why Consider It
Open-source firmware for KT unlocks granular shaping: detailed current ramps, PAS scaling curves, start delays, coast-resume behavior, and even mode-specific limits. It keeps the affordable KT hardware while giving you “tuner-grade” control.
Pros / Cons
- Pros: precise behavior, community presets, reversible.
- Cons: flashing procedure, not officially supported by all vendors, and requires comfort with firmware tools.
Practical advice: Dial in your bike on stock KT first; if you desire finer control, flash later and A/B compare.
Solution Path C – Cycle Analyst v3 Architecture (Advanced)
What CA v3 Adds
The Cycle Analyst v3 sits between your controls and a plain controller. It reads PAS, throttle, and optionally torque, then outputs a curated throttle signal to the controller. You gain:
- Mode-specific power/current caps
- Start ramp and gain shaping
- PAS/torque blending and rich datalogging
When to Choose
- You want pro-level tuning or plan to add a torque sensor later.
- You accept extra wiring/calibration and higher cost (~US $200-300+ total).
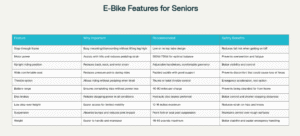
Recommended: Best Electric Bikes for Seniors 2025: Complete Safety & Comfort Guide
Safety, Legality & Ethics
Local Regulations
- Many regions cap assist speed (e.g., 25 km/h EU), and some restrict throttles on bike paths. Configure a legal-mode profile with the proper speed cap and, if necessary, PAS-only operation in certain areas. Keep proof of configuration on your phone for peace of mind.
Electrical Matching
- Don’t exceed your pack/BMS capability. Small 36 V 7-10 Ah packs dislike high burst amps-stay conservative (8-12 A).
- Inspect connectors for heat-darkening or looseness; replace suspect housings. Verify polarity with a meter before first power-on.
Practical Setup Walkthrough (KT Example)
Tools & Consumables
Multimeter, crimper and JST pins, heat-shrink, zip ties, dielectric grease, small torque driver, IR thermometer (optional).
Step-by-Step
- Document the OEM layout: photos + labels.
- Bench test the KT set (controller + LCD) before installing-verify the LCD boots and throttle reads.
- Motor first: connect phases + hall; spin test. If rough/backwards, swap two phase wires and align halls.
- Controls: connect PAS, throttle, e-brakes; repin where necessary (5 V-GND-SIG order).
- First power-on with wheel off ground; set base params (current, start %, ramp, speed cap).
- Short ride loop: tweak Level-1 current and start % until the bike creeps predictably.
- Harness tidy-up: add drip loops, strain relief at fold points, and a folding-safe LCD angle.
Tuning Targets (Cheat Sheet)
- Level-1 output: ~60-120 W for beginners or shared bikes.
- Start current: 10-20%; increase a few points only if hill starts feel mushy.
- Ramp: mid-soft; soften more for anxious riders or heavy cargo.
- Throttle curve: linear or mild S-curve; ensure fine control in the first 20-30% of travel.
Troubleshooting
No PAS Response
- Check for 5 V at PAS connector; verify V-G-S pin order.
- Ensure PAS enabled in LCD; some menus let you disable it.
- Spin cranks backward/forward-some sensors are directional.
Motor Jerks, Stutters, or Runs Backwards
- Swap any two phase wires; if still rough, verify hall order or try the controller’s auto-learn (if present).
Throttle Works Only When Pedaling
- Enable “Throttle in PAS” or “Throttle Override” in the LCD.
- Confirm brake cutoffs aren’t stuck active (controller will inhibit throttle).
Still Too Punchy at Start
- Lower start current %, increase slow-start, and reduce battery/phase amps one step.
- Shorten throttle gain; expand low-end deadband slightly if hands are shaky over bumps.
Cost & Time Estimates
- KT controller + LCD: US $80-120 (typical online kits).
- Install time: 1-2 hours for first-timers, plus 30-60 min for field tuning.
- Open firmware flash: add 30-45 min.
- Cycle Analyst path: US $200-300+, ½ day to wire/calibrate neatly.
Before/After UX (What Riders Notice)
- Starts go from lurchy → glide-on.
- Throttle finally controls how much assistance you get, not just a walk mode.
- Shared bikes become welcoming: Level-1 is truly beginner-friendly, and hill starts are calm rather than chaotic.
Maintenance & Long-Term Reliability
- Quarterly: check connectors for corrosion or looseness, inspect cables at fold joints, confirm brake sensors click reliably.
- Data habit: note typical L1/L3 current on a known route; rising values over time can flag bearing drag or poor connections.
- Keep spares: a PAS ring and a basic hall throttle are cheap and reduce downtime.
Appendix
Connector Pinouts (KT Standard vs Common OEM)
- PAS/Throttle/E-brake (3-wire/2-wire): KT uses 5 V (red), GND (black), SIG (other); verify colors with a meter.
- Motor Hall (6-pin): +5 V, GND, and three hall signals (Y/G/B).
- Phases (3-wire): Y/G/B; order can differ-test and swap as needed.
Glossary
- PAS: cadence-only sensor producing digital pulses per crank rotation.
- Speed-based vs Power-based: target speed (harsh) vs current cap (smooth).
- Start current %: initial torque at PAS onset or throttle tip-in.
- Phase current: motor winding current; governs launch torque feel.
- Slow-start (ramp): how quickly current rises from zero.
Starter Profiles (Copy & Tweak)
- Beginner / Family: Max batt A = 10 A; Start % = 12%; Ramp = 5; L1 ≈ 80 W, L3 ≈ 200 W, L5 ≈ 350 W; throttle linear.
- Commuter: Max batt A = 12 A; Start % = 18%; Ramp = 4; slightly quicker throttle.
- Hill Town: Max batt A = 12-15 A; Start % = 20%; Ramp = 4; L1 ≈ 100-120 W for confident hill launches.