Quick Summary
When your e-bike battery won’t charge, start with the basics.
1) Check the power source and charger – ensure the outlet works and the charger’s indicator lights come on.
2) Inspect connections and fuses – make sure the battery is seated correctly, terminals are clean, and no fuses are blown.
3) Reset the battery/BMS – some batteries need a reset or have an on/off switch or “ship mode” that must be disabled.
4) Mind battery health and temperature – let a hot battery cool down, avoid charging in freezing cold, and consider that an aged battery may struggle to charge.
5) Seek professional help or replacement – if all else fails, the battery or charger may be faulty and need expert repair or replacement.
Electric bike owners know the frustration of an e-bike battery not charging just when you’re eager to ride. An electric bike quickly turns into a heavy regular bike when the battery won’t charge, leaving you to haul extra weight with no assist. The good news is that in many cases, the solution is something simple you can address yourself. Often, a battery won’t charge due to a basic issue – for example, a faulty charger or a loose connection can commonly be the culprit.
This guide is a beginner-friendly troubleshooting walkthrough with a touch of expert insight, designed to help you pinpoint the problem and fix it.
We’ll cover five fixes for an e-bike battery that won’t charge – from double-checking your power outlets and charger, to inspecting battery connections and fuses, resetting the battery’s internal management system, adjusting for temperature or age-related issues, and finally when to seek a professional or consider a replacement. By the end of this guide, you’ll have a clear plan to get your electric bike’s battery charging properly again and be back on the road. Let’s dive into the fixes that can revive your e-bike’s lifeline and keep you rolling!
Fix 1: Check the Charger and Power Source

If your e-bike battery isn’t charging at all, the first thing to rule out is any issue with the power source or charger. It may sound obvious, but many charging problems trace back to something simple. Start by ensuring the wall outlet is supplying power. Plug another device (like a lamp or phone charger) into the same outlet to confirm it’s working. Some outlets in garages or older homes might be controlled by a switch or have a tripped breaker. Also, if you’re using a power strip or extension cord, eliminate that variable – plug the charger directly into a known-good wall socket to avoid any intermediary faults.
Next, inspect your e-bike charger itself. Check that all connections are snug: the charger’s power cable should be firmly plugged into the wall, and the charger’s plug should be securely connected to the battery’s charging port. Many chargers have an LED indicator light – typically red means charging and green means charged (or no load). Observe the charger’s LED: does it light up when you plug it into the outlet? If not, the charger may not be getting power or could be dead. If it lights up but stays green even when connected to an empty battery, it suggests the charger thinks the battery is full or isn’t making contact. A constant green light with a battery that won’t charge is a common sign of a charging issue. It could mean the charger isn’t actually delivering current, potentially due to a faulty charger or a break in the charging circuit.
An e-bike battery charger showing a red indicator light while actively charging (red indicates the battery is charging; it typically turns green when charging is complete).
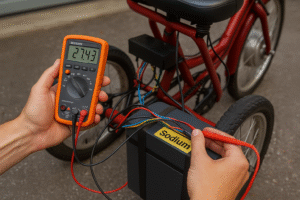
Take a moment to feel and examine the charger and cables. A charger that gets excessively hot, has a burnt smell, or shows visible damage (such as frayed wires or scorch marks) is likely faulty. In such cases, for safety, stop using it immediately. You can further test the charger by using a multimeter: with the charger unplugged from the battery but plugged into the wall, measure the output voltage at the charger’s plug. It should read slightly above your battery’s nominal voltage (e.g. a “48V” e-bike battery is actually ~54.6V when fully charged, so a healthy 48V charger outputs around 54-54.6V). If the charger’s output is zero or well below the expected voltage, the charger is not functioning properly. A quick alternative test is to try a different charger if you have access to one that’s compatible (same voltage and connector). If a second charger successfully charges your battery, then you know your original charger was the issue. Replacing a bad charger with a new one is usually the best course-chargers have complex electronics and aren’t typically user-serviceable. The good news is that a charger is much cheaper to replace than a battery.
Lastly, double-check any charger switches. Some e-bike chargers (especially those that can work on 110V or 220V) have a voltage selector switch. Make sure it’s set correctly for your region (in the United States, that would be 110/120V). Also, a few battery designs include an on/off switch or key position that must be set to “On” for charging. Consult your bike’s manual; if your battery has a power switch or key, try charging with the battery switched on (some riders have discovered their battery only charges when its built-in switch is in the on position). It’s an easy detail to overlook. By verifying the outlet power, examining the charger and its indicator lights, and testing or swapping the charger if needed, you’ll either identify a faulty charger or eliminate it as the cause. If everything with the power source and charger checks out, move on to the next fix.
Fix 2: Inspect Battery Connections and Fuses

After ruling out the charger, the next area to examine is the connection between the charger and the battery, as well as the battery’s internal safety fuse (if it has one). Poor connections or a blown fuse can prevent charging even when your charger is working fine. Start by ensuring the battery is properly seated or plugged in for charging. If your bike allows the battery to be charged on the bike, try removing it and charging the battery off the bike (or vice versa). This can help determine if a faulty charging port on the bike or alignment issue is to blame. Often, e-bike batteries have a cradle or tray with contacts; if the battery isn’t firmly locked in place, the charging contacts might not fully engage. Remove the battery, then reseat it securely, making sure any latching mechanism or lock is fully closed to pull the battery into proper contact.
Now, inspect the charging port and connectors on both the battery and the charger. Look for any debris, dirt, or corrosion on the metal terminals. Even a thin layer of oxidation can interfere with charging. If you see green or whitish crusty deposits on the terminals, that’s corrosion. Clean the contacts gently: first, ensure the battery is off (and ideally removed from the bike). Use a soft cloth, cotton swab, or a bit of isopropyl alcohol to wipe the contacts. For heavier corrosion, a small amount of electronics contact cleaner or a 1:1 mixture of vinegar and water can help dissolve it. Apply it carefully with a cotton swab, then wipe dry. Make sure everything is completely dry before attempting to charge again. Clean, solid connections ensure the charging current can flow from the charger into the battery. Also check that the charger’s plug is not loose or wobbly when inserted into the battery’s port – it should fit snugly. A loose connector might indicate wear or damage to the port.
Close-up of an e-bike battery’s charging port with the charger plug inserted correctly. Ensuring a snug, clean connection at the battery terminals and charger port is crucial for proper charging.
Another critical component to check is the battery fuse (if present). Many e-bike batteries have an internal fuse on the charging circuit (and often a separate fuse for the discharge/output circuit). If this fuse blows, the battery will not accept any charge. Symptoms of a blown battery fuse can include the charger staying green (as if it’s not charging) and the battery showing no increase in charge, since the circuit is open. Locate the fuse on your battery; it’s often hidden under a rubber cap or inside the battery case near the charging port or the main positive terminal. Some batteries use automotive-style blade fuses or cylindrical fuses that are accessible; others might have soldered fuses internally. If you can access it, visually inspect the fuse for a broken filament or burn marks. A blown fuse will appear burnt or the small internal wire will be broken, indicating it has melted due to an overcurrent. Replace the fuse if it’s blown, using one with the exact same rating (amperage) and type. This simple fix can save you from replacing the whole battery. For example, if your battery’s charging fuse is 5A, replace it only with a 5A fuse of the same style. Always ensure the battery is completely disconnected and powered off when checking or replacing fuses to avoid any short circuit.
While you’re at it, inspect the battery’s terminals and wiring (as much as is visible). Look for any loose wires, damaged insulation, or bent pins in the connectors. Sometimes, the issue could be as basic as a wire that has come loose from its solder inside the battery or charger plug. If the charging port feels loose or damaged, that could require repair or replacement by a technician. Also, consider the battery’s key or power switch if it has one. Some e-bikes require the battery to be in the “unlocked” position for removal but “locked” (which often also turns it on) to charge, while others might want the key in a certain position. Double-check any instructions from your bike’s manufacturer regarding how the battery should be set for charging.
By cleaning the contacts, ensuring a tight connection, and checking the fuse, you address the common connection issues that can prevent charging. Many riders have discovered that simply re-seating a loose battery or replacing a small fuse brought their “dead” battery back to life without further problems. If your charger and connections are all in order and the battery still won’t charge, proceed to the next fix, which deals with the battery’s internal controls and state.
Fix 3: Reset the Battery and Battery Management System (BMS)
If your e-bike battery still won’t charge after verifying the charger and connections, the issue might lie with the battery’s internal electronics. Modern lithium-ion battery packs typically include a Battery Management System (BMS) – a small onboard circuit that protects the battery cells from damage. The BMS can shut off charging under certain conditions, such as when the battery is fully charged, overly discharged, too hot, or if it detects a fault. Sometimes, resetting this system or related battery settings can resolve charging issues.
Try a simple reset: Remove the battery from the bike (if it’s removable) and turn the battery’s power off if it has a switch. Then, press and hold the battery’s power button (or the bike’s main power button) for about 10-15 seconds. This can drain any residual charge and potentially reset the battery’s internal circuitry. After holding the button, release it, wait a few seconds, then reinsert the battery and attempt to charge again. This kind of “power cycle” reset can clear a BMS that might have latched into a protection mode erroneously. Not all batteries will reset this way, but it’s an easy step that often goes overlooked. Additionally, some e-bike batteries or controllers have a dedicated reset button – usually a small pinhole reset that you press with a paperclip, or a combination of holding certain controls. Check your manual if you suspect such a feature; using it might instantly fix a battery that won’t charge due to a tripped protective circuit.
Another scenario is if your battery was deeply discharged or left unused for a long time. Lithium-ion batteries have a protective cutoff that puts them into a sort of “sleep” if the voltage falls below a critical level (often around 2.5-3.0V per cell). In plain terms, if you drained the battery completely and let it sit until it was totally empty, the BMS may have cut off all output and input to protect the cells. A battery in this state might appear to be “dead” and not charge at all with a normal charger. Some chargers detect this as if no battery is connected (hence the charger might stay green). Reviving a deeply discharged battery can be tricky and should be done with caution. One method is using a “trickle charge” or recovery mode on a smart charger, which slowly coaxes the voltage up until the regular charger will work. Another is the very risky “jump start” method, briefly applying a higher voltage or connecting a good battery in parallel – not recommended for casual users due to safety risks. Do not attempt aggressive revival methods unless you are experienced, because lithium batteries can be dangerous if mishandled. There are reports of batteries catching fire when improperly jump-started. If you suspect your battery is in a protective sleep mode (for instance, it was completely drained and then stored cold for months), you might try leaving it plugged into the charger for an extended period. Some chargers will periodically send small pulses of charge; over hours this might slowly raise the battery’s voltage enough for charging to resume. But if nothing changes after a day on charge, stop – you’ll need a professional’s help to revive it safely.
Speaking of safety modes, ensure your battery isn’t simply in “shipping mode” or locked-off state. Certain e-bike brands ship batteries in an inactive mode to prevent any power drain or hazards during transit. For example, Rad Power Bikes include a ship mode that you must exit by holding the battery button for 3+ seconds to enable charging and power output. Until you do that, the battery won’t take a charge at all. If you recently got a new battery or bike, check the documentation for any mention of unlocking or activating the battery. A quick press-and-hold of the battery’s main button (or a sequence of button presses) might be required to wake it up from ship mode. You should see the battery’s LED indicators flicker or turn on after doing this, indicating it’s now active.
Lastly, consider if the BMS is faulting due to an ongoing issue. For instance, if the BMS detected a short or imbalance, it might repeatedly cut off charging. In some cases, disconnecting the battery from any load and charging it in a safe environment can reset an error. But if the BMS hardware itself has failed (or a cell group within the battery is damaged), no amount of resetting will fix it – the BMS will keep preventing charging for safety. One clue that the BMS is actively stopping charge is if the battery’s own indicator lights maybe flash an error code when you try to charge, or if the battery works (puts out power to the bike) until you plug in the charger, then everything cuts off. These are complex symptoms, but essentially, if a battery management system error is suspected and simple resets haven’t helped, you might need a new BMS board or professional repair.
In summary for this fix: attempt the easy resets – power cycling the battery, exiting any ship mode, and trying to gently wake a sleeping battery. These steps can often bring a non-charging battery back to life when the cause was an electronic lock-out. But always keep safety in mind; if unusual behavior persists, it’s time to look at the battery’s condition and possibly consult an expert (which we will cover in Fix 5). Before that, one more thing to evaluate is the environmental and health factors affecting your battery, which we address next.
Fix 4: Consider Battery Health and Environmental Factors

Sometimes an e-bike battery that won’t charge isn’t broken at all – it’s just outside its comfort zone. Lithium-ion batteries are sensitive to temperature and have a finite lifespan. If your battery and charger seem okay but charging still fails or is intermittent, think about the conditions under which you’re charging and the battery’s age/health.
Temperature is a key factor. Most e-bike batteries will refuse to charge (or the BMS will block charging) if the battery is too cold or too hot. This is a protective measure, as charging outside the safe temperature range can damage the cells or even pose a safety hazard. For instance, trying to charge a lithium battery below freezing (32 °F or 0 °C) can cause plating on the anodes, permanently harming the battery. Likewise, charging a overheated battery (like one that’s just been through a hard ride on a 100 °F day) can push it into thermal stress. Manufacturers typically specify an optimal charging temperature range – often around 50 °F to 77 °F (10 °C to 25 °C) for best performance. If your battery is too cold, you may find that the charger simply won’t start the charge. The fix is to warm the battery to room temperature gradually (do not apply direct heat; just bring it indoors and let it acclimate for an hour or two) and then try charging again. Conversely, if the battery is too hot, maybe from riding or being in the sun, give it time to cool down to a normal room temperature before charging. Some riders notice that after a long uphill ride, if they plug the battery in immediately, nothing happens – but after 20-30 minutes, the charger light turns red and charging begins once the battery cooled sufficiently. Always charge in a dry, ambient environment – a garage or house at moderate temperature is ideal. Avoid charging outdoors in freezing weather or under direct summer sun. Temperature-related charging issues often resolve just by moving the bike/battery to a better environment.
Now consider your battery’s overall health and age. Lithium batteries don’t last forever. Over time and with use, they undergo chemical wear which reduces their capacity and efficiency. Typically, an e-bike battery is rated for a certain number of charge cycles (often 500 to 1000 full cycles) which might equate to 2-5 years of use for many riders. As the battery ages, one symptom (aside from not holding as much charge) can be increasing internal resistance – this makes it harder for the charger to “push” charge into the cells. In fact, studies have found that an aging lithium-ion battery’s internal resistance can rise by 20-30% compared to its new state, causing it to charge more slowly and heat up more. If your battery is a few years old and has seen heavy use, the reason it won’t charge fully or won’t charge at all might simply be that it’s at the end of its life. Signs of this include the battery charging only for a short time before the charger goes green (battery appears full but gives very little runtime), or the battery never reaching full voltage anymore. No quick fix can undo aging – each battery cell only has so many charge cycles in it. However, you can sometimes still get some use out of an older battery by charging it in smaller bursts (letting it rest in between) or only up to 80% to reduce stress. But if it’s gotten to the point where the battery won’t charge enough to be usable, it might be time to plan for a replacement.
Also, inspect the battery for physical issues. Do you see any bulging, cracks, or leakage? A swollen battery pack is dangerous – it indicates cell damage, and such a battery should not be charged or used further. Physical damage to the battery casing could mean internal cells or circuitry are harmed, which could be the reason it’s not charging (the BMS might be preventing charging due to a fault). If the battery suffered a crash or water ingress, those could also cause failure. Water, in particular, can corrode internal connections or short things out – if a battery got soaked and then won’t charge, it likely needs professional attention.
In terms of maintenance, if you often run your battery all the way down to 0% or leave it unused for months at 0%, it may have suffered a deep discharge that makes recharging difficult. Best practice is to avoid fully depleting the battery regularly (try to stop at 20-30% remaining) and never store an e-bike battery empty – store around 50% charged if possible. If your battery “won’t charge” because it’s been on a shelf for a year and is now at 0%, it may require special revival as discussed earlier, or it might be permanently damaged.
To sum up this fix: ensure your battery is being charged under the right conditions – neither too cold nor too hot. If it’s winter in the United States and your bike is kept in an unheated garage, bring the battery inside to charge. If it’s a scorching summer day, charge the battery in a cool indoor spot. Temperature alone can be the reason a battery refuses charge, and the solution is simply adjusting the environment. Additionally, evaluate the battery’s age and health. If it’s old or heavily used, recognize that it might not be a simple “fix” at fault – the battery could be naturally declining. In the next section, we’ll discuss what to do if you suspect the battery itself is faulty or has reached the end of its service life.
Fix 5: Seek Professional Help or Consider Battery Replacement
After trying all the above fixes, if your e-bike battery still won’t charge, it’s likely that there is a more serious issue with the battery (or charger) hardware that at-home fixes can’t resolve. Don’t get discouraged – e-bike batteries can be repaired or replaced, and your bike can be up and running again with a bit of professional help. Here’s what to consider at this stage.
Consult a professional technician or your bike’s customer support. If your bike or battery is still under warranty, contact the manufacturer or retailer. They might diagnose the issue through support emails/calls or have you bring the battery in for service. Even outside of warranty, many e-bike shops or battery specialists can perform diagnostics. They can test whether the charger is delivering power under load, and they can open the battery (with proper safety precautions) to check the voltage of individual cells and the status of the BMS. Internal failures like a bad BMS circuit or a series of dead cells will prevent charging. For example, if one cell group in the pack has failed, the BMS might indefinitely block charge for safety. While a skilled technician can sometimes replace a BMS or even swap out bad cell groups, this is not typically something a casual user should attempt. Manufacturers like Bosch explicitly warn consumers not to open or tamper with battery packs, due to risk of fire, shock, or voiding warranties. Unless you have specific battery repair expertise, it’s safest to leave internal repairs to the pros. In many cases, battery repair can be costly and not guaranteed, which is why a lot of experts simply advise replacing the battery entirely if it’s faulty.
Speaking of replacement, consider buying a new battery if it’s financially feasible. This is often the surest “fix” for a battery that refuses to charge due to internal faults or old age. While e-bike batteries aren’t cheap, they are the heart of your e-bike’s performance. If your current battery is beyond rescue, a new battery pack will restore your bike to like-new range and reliability. Before buying, double-check the specifications to get the correct replacement (voltage, physical fit, connector type) ideally from the bike manufacturer or a reputable third party that guarantees compatibility. Also, if the charger was suspect, you might replace that first (it’s much cheaper) or together with the battery. We’ve seen earlier that a faulty charger can mimic a bad battery. So ensure you have a working charger for your new battery.
One more thing: don’t attempt dangerous DIY fixes on the battery. It might be tempting to open the pack and tinker, especially if you’re technically inclined, but know that e-bike batteries contain a lot of energy. A wrong move (like a short circuit while disassembling) can result in severe injury or fire. Also, replacing individual cells requires matching them and soldering or spot-welding, which is quite advanced. Given the safety risks, if a battery is determined to be bad, the practical fix is replacement. In fact, most battery professionals will suggest buying a new pack rather than trying to rebuild a failing one at home. Dispose of the old battery responsibly (take it to an e-waste or battery recycling center). Never throw a lithium battery in the trash.
On the charger side, if you haven’t already solved the issue, by this point you should also consider replacing the charger (if you haven’t tried a known-good charger yet). Chargers do fail, and they’re relatively affordable. Ensure the new charger matches the battery’s specs (voltage and amperage output). Using the wrong charger can be dangerous – for instance, a charger with too high voltage can overcharge and damage the battery, and one with too low voltage might not charge it fully or at all. Stick with the manufacturer’s charger or a high-quality equivalent.
In summary, Fix 5 is about recognizing when the problem is beyond quick fixes. If your e-bike battery still won’t charge after all troubleshooting, the safest and most reliable solution is to get a professional diagnosis and likely replace the battery or charger. It might sting the wallet, but it will restore your e-bike’s functionality. Think of it as a periodic maintenance cost – just like eventually needing new tires or brake pads, e-bike batteries also have a replacement cycle in their lifespan. The upside is that a fresh battery will give you full power and range, rejuvenating your riding experience. Once you have a new or repaired battery in hand, remember the lessons from this guide: treat it well by using the correct charger, keeping connections clean, and charging under proper conditions to maximize its life.
With the main fixes covered, let’s quickly recap the key points and then answer some frequently asked questions that e-bike owners often have about batteries not charging.
Key Points Recap

- Double-Check Power & Charger: Always verify the outlet and charger first. A surprising number of e-bike charging issues boil down to an unpowered outlet or a faulty charger. Ensure the charger’s indicator lights turn on and that it’s outputting the correct voltage. If in doubt, test with a multimeter or try a second charger.
- Connections Matter: A loose or dirty connection can stop your battery from charging. Remove and reseat the battery, clean the contacts, and inspect the charger port. Corrosion or debris on terminals should be cleaned off to restore proper contact. Also, ensure any battery switch or key is in the correct position for charging.
- Check the Fuse: Many e-bike batteries have internal fuses on the charging line. If your charger stays green and no charge goes in, a blown fuse could be the culprit. Replacing a blown battery fuse (with the same rating) is a simple fix that can save you from replacing the entire battery.
- BMS and Reset Tricks: The battery’s management system may prevent charging due to low voltage or other faults. Try holding the power button ~10 seconds to reset the battery/BMS. If the battery was very empty, leave it on the charger for a few hours to see if it wakes up. New batteries in “ship mode” need a 3-second button hold to activate before they’ll charge.
- Temperature and Age Factors: Always charge your battery in a moderate environment. Batteries won’t charge if they are too cold or too hot – aim for roughly 50-77 °F (10-25 °C) for charging. If you just rode hard, let the battery cool before charging. And remember, an older battery (with many cycles) may struggle to charge or hold charge due to natural wear. If it’s several years old, its diminished performance might be a sign that it needs to be replaced.
- When to Repair or Replace: If none of the simple fixes work, it’s likely an internal battery issue. Do not disassemble the battery unless you know exactly what you’re doing – it’s dangerous. Instead, consult an e-bike technician or consider getting a replacement battery. Most experts recommend replacing a bad battery rather than attempting DIY repairs, for safety and reliability.
By keeping these points in mind, you can systematically troubleshoot a non-charging e-bike battery and address the common problems that arise.
Conclusion
By following the five fixes outlined in this guide, you’ve addressed the most common causes of a battery that won’t charge. With a bit of luck (and perhaps a new fuse or charger), your e-bike will be powered up and ready to roll. Now it’s time to enjoy the ride again – knowing you’ve got the know-how to tackle any battery charging hiccups that come along. Happy riding, and may your battery be ever charged!
FAQs
Q1: Why does my charger light stay green but the battery isn’t charging?
A: That usually means no current is flowing. It’s often due to a loose connection, dirty terminals, or a blown charging fuse, causing the charger to think the battery is full when it’s not.
Q2: How can I tell if my e-bike charger works?
A: Check if the charger’s indicator light turns on, and use a multimeter to measure its output voltage (should be slightly above your battery’s nominal voltage). No voltage or no light = charger issue.
Q3: Can I revive an e-bike battery that’s fully drained?
A: Possibly – with trickle charging or a gentle “wake up” method – but it’s risky. If it doesn’t respond, the battery may be permanently damaged and need professional attention.
Q4: Do e-bike batteries have fuses, and can a blown one stop charging?
A: Yes. Many batteries have a charging fuse. If it’s blown, it will open the circuit, stopping all charging. Replacing the exact same fuse can restore function if this is the issue.
Q5: How long do e-bike batteries last, and when should I replace mine?
A: They typically last 3-5 years or 500-1000 charge cycles. Replace your battery when it holds much less charge, misbehaves despite fixes, or shows signs of damage.