Ever seen that quick zap when you connect a pack and wondered if you just shaved years off your controller’s life? This guide connects the dots from phenomenon → physics → scenarios → fixes → maintenance & troubleshooting. You’ll get a clean power-on routine, when and how to use pre-charge/anti-spark, and simple checklists to keep parts healthy-whether you use a cradle battery, direct XT plugs, or a high-voltage, high-capacitance controller.

The Phenomenon & The Physics: Why Does It Spark?
Is a hookup spark normal-or controller-killing?
Most of the time, yes, a small spark is normal. Your controller’s input capacitors are at 0 V; the moment you connect the battery, they get slammed with a high inrush current as they charge. Small, soft tick and brief glint = typical. But very bright, loud, frequent arcs-especially followed by hot terminals or soot/pitting-mean the inrush is too aggressive and is eroding contacts, raising resistance, and stressing BMS/MOSFETs. Control it.
How “big” is too big? A practical danger threshold
Use a quick 4-point sanity check: Bright / Loud / Hot / Blackened.
- One box ticked: optimize your routine soon.
- Two or more: implement pre-charge or other mitigation now.
Can sparks overheat, pit, or start bigger problems?
Arcing pits metal and leaves carbonized residue. That raises contact resistance, which heats more under load, which accelerates oxidation-a snowball effect. While “a little spark” isn’t instant doom, leaving it unchecked shortens connector life and can contribute to intermittent cutouts or, in extremes, thermal damage.
Recommended: Pedego Electric Bikes Reviews (2025): Warranty, Lineup, Pros & Cons
What Makes Sparks Worse? Voltage, Caps, Leads, and Connector Geometry
Which factors set spark intensity?
- Higher pack voltage (52/60/72 V vs 36/48 V)
- Larger controller input capacitance
- Lead inductance/length and how quickly contact pressure ramps up
- Connector style & contact area (e.g., bullet vs XT series)
Bigger voltage + bigger caps + smaller/sloppier contact area = bigger arc. Connectors with reliable contact geometry (e.g., XT series) behave more predictably; “S” variants with built-in pre-charge (e.g., XT90S) can significantly soften inrush-but only if the spark occurs at that connector.
If the spark happens at the battery cradle contacts, will an XT90S help?
Not much. XT90S only tempers arcs at the XT connection. If your “make/break” occurs inside a cradle (spring blades/tabs), external anti-spark plugs won’t protect those cradle contacts. In that case, you need a switch on the battery, or a pre-charge path located in the cradle’s current path.
Recommended: Cybervelo 1000 Peak Electric Bike Review – Specs, Performance & Verdict
Do This First: No-Hardware-Change Power-On Routine
With a pack that has a physical switch: the correct sequence
OFF → seat/connect → ON.For power-down: OFF → then disconnect/remove.This keeps the “first touch” at zero volts and avoids hot-plugging loads.
Checklist
- Confirm the pack switch is OFF before seating.
- Seat fully; ensure connectors are fully mated.
- Throttle at zero, no brakes locked, no heavy lights/accessories on.
- Switch ON, pause 1-2 s, then operate.
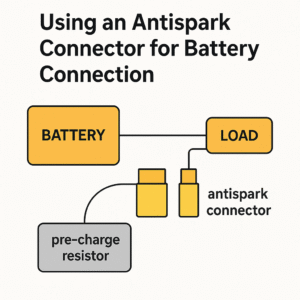
No switch on the pack? A simple, low-cost pre-charge lead
Add a small parallel path around the main connector: a thin wire + resistor (e.g., 100-330 Ω, 5-10 W or higher). Sequence: touch pre-charge first for 1-3 s to charge controller caps → then push the main connector home. Reverse for removal.
Fast, practical sizing
- Goal: limit initial pre-charge current to ≲ 0.5-1 A.
- 36-52 V: 100-220 Ω is a common sweet spot.
- 72 V: 220-330 Ω typical.
- Initial resistor power ≈ V2/RV^2 / RV2/R (transient). Overbuild wattage by 2-3× (e.g., 52 V & 220 Ω → ~12 W transient → pick 25 W if space allows).
- Big-cap controllers may want 3-5 s pre-charge.
- Use a labeled, polarity-safe pigtail or a small pre-charge board/SSR solution if you want it tidy.
Do/Don’t
- Do secure the resistor, insulate with heat-shrink, and keep it away from plastics/fabric.
- Don’t leave the system “running through the resistor”-always close the main path.
What counts as hot-plugging and how do I avoid it?
Any connect/disconnect while the controller isn’t “quiet” is hot-plugging: throttle not at zero, PAS active, lights/heaters blasting, wheel under load, BMS just waking, etc. Rule of thumb: quiet the system to idle before connecting or disconnecting.
Recommended: Which Electric Bikes Have Regenerative Braking?
Picking a Solution: From “Works” to “Rock-Solid”
Do I need an anti-spark connector-and when does it actually help?
If you make/break at an external plug, anti-spark variants like XT90S help a lot. If your make/break is at the cradle, you need the anti-spark/pre-charge in that path (i.e., a switchable cradle, integrated pre-charge, or internal mod).
Swap connectors vs add a dedicated pre-charge circuit?
- Swap to anti-spark plug: simple, clean, and effective-at that plug only.
- Dedicated pre-charge circuit (resistor/relay/board): more universal and can protect cradle contacts, but adds wiring and a bit of cost.Upgrade ladder: fix the routine first → if needed, use anti-spark at the right location → only then consider structural changes.
What resistor value/wattage should I choose?
- 36-48 V: 100-220 Ω, ≥10 W short-duty (bigger is safer).
- 52-72 V: 220-330 Ω, ≥10-25 W short-duty (bigger is safer).
- Want to calculate? For input capacitance CCC, choose RRR so τ=R⋅C\tau = R \cdot Cτ=R⋅C fits your wait time (2-3 τ reaches ~86-95% of pack voltage). Ensure initial V2/RV^2/RV2/R power is within the resistor’s transient limit, with 2-3× headroom.
Do I have to modify the cradle or controller to nearly eliminate sparks?
Not necessarily. Structural fixes (battery with real switch, cradle with staged contacts, or controller with soft-start/pre-charge module) are the most seamless-but also the most involved. For most riders: routine → anti-spark at the right make/break → structural mods last.
Recommended: Top-Selling Electric Bikes on Amazon: Performance and Value Analysis
Build & Validate: A Step-by-Step Example (No-Switch Pack + Pre-Charge Lead)
Parts & Tools
- Connectors: XT60/XT90/XT90S (as appropriate)
- Pre-charge: resistor (100-330 Ω, 10-25 W or higher), optional pre-charge board/SSR
- Wiring & consumables: silicone wire, heat-shrink, strain relief, ties, sealant
- Instruments: multimeter, temp probe/IR thermometer, clamp meter (optional)
- PPE: insulated gloves, eye protection, flame-resistant pad
Installation (example flow)
Plan routing and mounting points. Verify polarity before soldering. Make full-wet, shiny solder joints; heat-shrink properly. Add strain relief.Power-up sequence: pre-charge first (1-3 s) → main connector → stow pre-charge lead.Power-down: main off first → then break pre-charge.
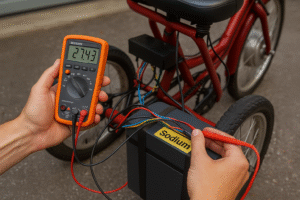
How to prove it works (3 quick tests)
- Spark visibility: should be dramatically reduced or gone.
- Temperature: under typical load, connector shells/contacts stay comfortably below ~60 °C (context-dependent).
- Voltage drop: measure under load-no abnormal rise.If results are poor, re-check connector pressure, cleanliness, resistor value/time, and wire gauge.
Maintenance & Service Life
How do I clean pitted/blackened contacts?
Use a contact cleaner + fine abrasive (rubberized abrasive or very fine grit). Finish with isopropyl alcohol and dry thoroughly. If plating is gone or pits are deep, replace the terminals. For low-voltage/low-current auxiliaries, a thin film of approved contact protector can help-follow manufacturer guidance.
When should I replace connectors or a cradle?
Any of these is a red flag: sloppy fit, discoloration/blistering, abnormal insertion force, noticeably hot under load, intermittent power in rides. Two or more? Replace now.
Do rain or humidity make sparking worse?
Yes. Moisture can form conductive films, lowering surface resistance. Improve sealing (heat-shrink + gaskets), keep interfaces clean/dry, wipe down after wet rides, add desiccant in enclosed spaces.
Will frequent small sparks shorten BMS or MOSFET life?
Repeated inrush and arcing do add cumulative stress to capacitors and switching devices. Routine discipline + pre-charge meaningfully lowers that stress; on high-voltage/big-cap systems, treat pre-charge as standard kit.
Troubleshooting (Fast Decision Paths)
After occasional arcing I now get intermittent cutouts/shudder-what do I check first?
Work from source to load:
- Battery/BMS: healthy voltage? false trips?
- Connectors/cradle: soot, looseness, high contact resistance?
- Harness: kinks, cold joints, water ingress?
- Controller: loose screws/terminals, input block integrity?
- Signals: throttle/brake/Hall wiring continuity, no intermittent shorts.
Still seeing sparks or elevated temps after pre-charge?
Verify the sequence (pre-charge long enough), resistor value (too small), contact pressure & cleanliness, wire gauge, and whether accessories are loading the bus at connect-time. Change one variable at a time.
Pocket Checklists (Print/Pin These)
- Power-On (with switch): OFF → seat/connect → ON; reverse to power-down.
- Power-On (no switch + pre-charge): pre-charge 1-3 s → main plug; power-down is main off → break pre-charge.
- Pre-charge quick picks:
- 36-48 V: 100-220 Ω, ≥10 W (bigger is safer)
- 52-72 V: 220-330 Ω, ≥10-25 W (bigger is safer)
- Monthly: clean contacts, check looseness/soot, quick temp check under load, inspect harness & seals.
- Quarterly: re-measure voltage drop under load, re-secure mounts, inspect resistor/board insulation & strain relief.
FAQ
- Is the spark normal? Will it fry the controller? Often normal; tame it. If the event is bright/loud/hot/sooty, implement mitigation.
- No switch? Use a pre-charge lead/board: limit inrush, then close the main path.
- Spark at cradle contacts-will XT90S fix it? Not really; place pre-charge where the spark actually occurs.
- How do I size the resistor? 36-48 V: 100-220 Ω; 52-72 V: 220-330 Ω; give 2-3× power headroom; 1-3 s is typical wait.
- How do I validate fixes? Sparking much reduced, connectors cooler, voltage drop normal.
Conclusion: A Simple Decision Rule
Do the routine right first (no hot-plugging, system idle at connect).If the spark is still bright/loud or contacts get hot/black, add pre-charge at the exact make/break point.For high-voltage/big-cap or cradle-spark setups, consider structural options (switchable cradle, built-in soft-start).This sequence protects your controller/BMS, reduces wear, and keeps maintenance costs predictable.