Yes, many riders have powered M510/M560 with 14S (58.8 V full), but “it runs” is not the same as long-term reliable. If you try it, treat 58.8 V as the edge of the hardware envelope, cap voltage, control current & heat, use pre-charge/anti-spark, and set a 14S-appropriate low-voltage cutoff on the battery side. This guide shows exactly how.
Why even consider 14S on an M510/M560?
Potential gains
- Lower current for the same power → less cable/connector loss and cooler operation.
- Stronger top-end at the same current limit (volts × amps = watts).
- Smoother feel when the motor isn’t current-starved.
Trade-offs
- You’re likely pushing parts that were selected around a 48 V (13S) system.
- Firmware thresholds (LVC/OVP) stay tuned for 13S unless you change FW.
- Long-term stress rises if you run full 58.8 V with spikes/heat.

Understand the electrical envelope (plain-English version)
- Nominal system: The M510/M560 families are commonly treated as “48 V” (13S Li-ion).
- Component headroom (typical for this class, varies by batch):
- Bus capacitors often 63 V rated
- MOSFETs frequently 75 V class
- DC/DC converters, display & sensor rails must also survive the bus voltage
- Why 58.8 V is risky: plug-in surges and cable inductance can create voltage spikes above the steady pack voltage. If your steady is 58.8 V and a spike goes +5 V, you’re flirting with (or exceeding) 63 V parts.
Key idea: It’s not just “can it power on?” It’s “will it remain healthy across heat, hills, and spikes?”
Recommended: Ancheer Electric Bike Review
The safe-ish way to try 14S (no firmware change)
1) Cap the maximum voltage
- Best practice: Charge-cap to ≤ 56.0 V (~4.00 V/cell) or even 54.6 V (13S full equivalent) when testing.
- If you insist on 58.8 V full, you must minimize surges:
- Use pre-charge/anti-spark (e.g., XT90S or a resistor pre-charge lead).
- Keep leads short & thick, connectors high-quality, and never hot-plug.
Why it works: Lower bus voltage gives the 63 V parts and DC/DC converters margin for spikes and summer heat.
2) Be conservative with current and heat
- If your display/app allows, reduce battery current limit and phase current by 10-20 % for initial tests.
- Monitor controller & motor case temps. If you can’t keep a finger on it for 2-3 s (> 70 °C), you’re too hot.
- On long climbs: drop a PAS level or shift to raise cadence and airflow.
Why it works: Power is V×I. With higher V you need less I. Back off a little current while you validate temps.
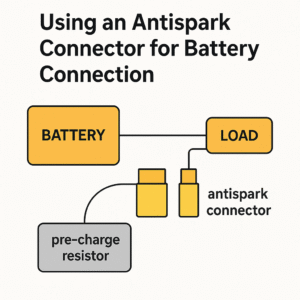
3) Use pre-charge to kill inrush
- Add a pre-charge resistor (e.g., 100-220 Ω, ≥ 10-25 W) or an anti-spark connector.
- Sequence: pre-charge 1-3 s → close the main connector. Reverse when powering down.
Why it works: Your controller has big input capacitors. Pre-charge fills them gently and prevents that destructive plug-in spark/spike.
Recommended: Best Recommended Durable Hydraulic Brake Conversion Kits for Electric Bikes
4) Don’t trust the stock low-voltage cutoff
- Firmware LVC likely assumes 13S (e.g., ~41-42 V pack). On 14S, that’s over-discharge.
- Set your battery-side BMS or external meter/alarm to a higher cutoff:
- Recommended ride-end under load: ≈ 3.3 V/cell → 46.2 V (14S)
- For longevity, stop even earlier (e.g., 3.4-3.5 V/cell under load).
Why it works: You protect the cells because the motor firmware won’t.
5) Mind accessories and DC/DC rails
- Avoid powering lights or gadgets straight from the 14S bus unless they’re rated for it.
- If needed, add a separate buck converter with adequate input rating (≥ 72 V rated modules are common and safe overhead).
Step-by-step validation plan (do this, log it)
- Bench power-on (wheel off ground):
- Pack at ≤ 56 V. Pre-charge first. Any error codes? Unusual noises?
- No-load spin:
- Low PAS; blip throttle. Look for oscillation or cutouts.
- Flat test ride (2-3 km):
- Watch temps at the controller and motor. Log peak current and voltage sag.
- Short hill test:
- One minute up a mild grade, PAS 2-3. Recheck temps. If they climb fast, reduce current limits and/or voltage cap.
- Compare data:
- If you have 13S logs, compare watts vs temp to decide if 14S is truly helping you.
Pass criteria: no errors, modest temps, no alarming surges on connect, and performance that’s meaningfully better than 13S at equal or lower current.
Recommended: Best Electric Bikes for Seniors 2025: Complete Safety & Comfort Guide
Quick reference tables
A) Do / Don’t at a glance
| Scenario | Do | Don’t |
|---|---|---|
| First 14S tests | Cap charge to ≤ 56 V, pre-charge, short/thick leads | 58.8 V hot-plugging |
| Long climbs | Drop PAS a notch, keep cadence high | Grind at low cadence on max assist |
| LVC strategy | Use battery-side cutoff for 14S | Rely on 13S firmware LVC |
| Accessories | Use a rated buck or separate supply | Hang accessories directly off 58.8 V |
| Evaluation | Log temps, current, voltage sag | Assume “powered on = safe” |
B) Practical voltage targets (14S)
| Use case | Pack top-off | Notes |
|---|---|---|
| Cautious validation | 54.6 V (13S full equivalent) | Large safety margin |
| Daily riding (balanced) | 55.5-56.0 V | Good compromise of margin & punch |
| Performance days | 57.0-58.0 V | Use pre-charge; monitor temps |
| Edge of envelope | 58.8 V | Only if all other controls are perfect |
Common mistakes to avoid
- “It powered on, so it’s fine.” Not a test. You need thermal and surge margin.
- Skipping pre-charge. Inrush arcs erode connectors and can spike beyond 63 V.
- Depending on motor LVC. On 14S you risk over-discharge. Protect the battery.
- Ignoring batch variance. Components change. What survived on one bike may fail on another.
- Summer hubris. Heat + high voltage + long climbs = the failure cocktail.
Recommended: How to Troubleshoot an Electric Bike Controller – Step-by-Step Guide
Frequently Asked Questions
1) Will 14S damage my M510/M560?It can-especially at 58.8 V full with no pre-charge and high currents. Many riders have used 14S successfully by capping charge, reducing current, and managing heat. Proceed as if you’re at the hardware limit.
2) Do I need to flash firmware to run 14S?No, it can run without FW changes, but you’ll still have 13S-oriented thresholds (e.g., LVC). That’s why a battery-side cutoff and a charge cap are recommended.
3) What anti-spark/pre-charge should I use?A simple 100-220 Ω, ≥ 10-25 W resistor lead, or a XT90S anti-spark connector. Sequence matters: pre-charge 1-3 s → close main.
4) What current should I start with?Reduce your usual battery current by 10-20 % when first testing 14S. You can raise it gradually if temps remain tame.
5) Will I get more speed?Potentially, yes-especially if your top-end was voltage-limited. But thermal limits and local laws still apply; don’t overheat the system chasing speed.
6) Is warranty affected?Almost certainly. Running outside listed specs can void coverage. Decide accordingly.
Safety & compliance notes
- Legal limits on speed/throttle may apply; keep a “legal mode” profile handy.
- Treat 14S as experimental if the datasheet/marketing materials only advertise 48 V systems.
- Wear PPE when wiring; never short a 14S pack; use insulated tools.
Action plan you can copy
- Set your charger or BMS to ≤ 56.0 V.
- Add pre-charge/anti-spark and fix sloppy connectors/long leads.
- Drop battery & phase current limits by 10-20 %.
- Configure a battery-side LVC appropriate for 14S (e.g., 46-48 V under load).
- Run the 5-step validation; log temps and current.
- If all good, inch up voltage (≤ 58 V) or current in small steps, watching temps.