I’ve spent years tinkering with electric bikes, and nothing frustrates me more than a controller that suddenly quits. Signs like no power, jerky motor action, or cryptic error codes can ruin your day. Drawing from countless repairs, this guide explores causes, hands-on fixes, and prevention strategies. Often, it’s something simple like a loose wire or drained battery. We’ll walk through it step by step, so you can revive your ebike with confidence. Let’s dive in and get you back pedaling smoothly.
Featured Summary
In this detailed guide, I share my insights on why your electric bike controller might fail and how to fix it effectively. We begin with the basics of what the controller does, then explore common culprits like water ingress, overheating, and wiring woes. I’ll guide you through a thorough troubleshooting process, from battery checks to sensor tests, using tools like a multimeter for precision. You’ll learn when it’s time to replace the unit and pick up essential maintenance habits to prevent repeats. By the end, you’ll feel empowered to handle ebike controller issues like a pro, saving time and money on repairs.

Understanding the Electric Bike Controller
As someone who’s disassembled dozens of these, I can tell you the controller is truly the heart of your electric bike. It orchestrates everything from battery power to motor output, ensuring your ride feels effortless. Without it functioning properly, even the best ebike becomes just a heavy pedal bike.
What Does the Controller Do?
It interprets signals from your throttle or pedals, then doles out power accordingly. This creates that smooth acceleration you love. In my experience, a well-tuned controller can transform a basic setup into a high-performance machine.
Common Symptoms of Failure
You might notice the motor doesn’t engage, or it surges unpredictably. Displays often flash errors like “E01” for low voltage. I’ve seen riders puzzled by these, but they’re clues pointing straight to controller trouble.
Over time, symptoms can worsen, leading to complete shutdowns during rides. This not only strands you but can be dangerous in traffic. Recognizing them early saves hassle.

Common Causes of Electric Bike Controller Issues
Through hundreds of diagnostics, I’ve identified patterns in why controllers fail. Water and heat are frequent villains, but don’t overlook vibrations or component mismatches. Understanding these helps you avoid costly mistakes.
Water Damage and Exposure
Rain can sneak into unsealed casings, causing shorts and corrosion. I’ve repaired many after a single downpour. Even humidity in storage can build up over time, leading to intermittent faults.
Controllers aren’t always waterproof, despite what some claim. Washing your ebike with a hose often spells disaster. Seal any gaps with silicone for extra protection.
Overheating from Overuse
Pushing limits on steep hills generates excess heat, melting internals like MOSFETs. An undersized controller exacerbates this. In my shop, I’ve seen charred boards from riders ignoring amp ratings.
Heat buildup happens gradually, but sudden spikes during long rides accelerate damage. Poor ventilation in enclosed designs worsens it. Always match your controller to the motor’s demands.
Faulty Wiring and Loose Connections
Road vibrations loosen connectors, creating resistance and failures. Frayed insulation exposes wires to shorts. I’ve fixed countless issues by simply reseating plugs.
Corrosion from salt or dirt adds another layer of trouble. Regular visual checks catch these early. Use dielectric grease to shield connections from elements.
Battery and Sensor Problems
A sagging battery voltage tricks the controller into thinking it’s faulty. Hall sensors in the motor can fail, disrupting timing signals. I’ve encountered this mimicking complete controller breakdowns.
Sensor misalignment from bumps is common too. Test outputs with a multimeter to confirm. Replacing cheap sensors often resolves it without touching the controller.
Blown Fuses or Switches
Surges blow internal fuses, cutting power abruptly. Faulty on/off switches wear out from daily use. In diagnostics, I always check these first for quick wins.
Capacitors degrade over cycles, leading to unstable operation. Cold solder joints crack under stress. These internal issues require opening the case carefully.
Additional Culprits: Vibration and Component Mismatch
Constant shaking fatigues solder points and components. Bad thermal paste fails to dissipate heat. I’ve seen controllers die prematurely from mismatched batteries or motors.
Using a 48V controller with a 36V system invites trouble. Always verify specs. Upgrading without compatibility checks is a recipe for failure.
Use this expanded table to compare causes:
| Cause | Symptoms | Prevention | Common Fixes |
|---|---|---|---|
| Water Damage | No power after wet rides, corrosion visible | Seal with silicone, avoid rain | Dry out, clean circuits |
| Overheating | Cuts out under load, burnt smell | Proper sizing, add heatsinks | Replace MOSFETs, improve airflow |
| Loose Wires | Intermittent power loss | Secure with ties, regular checks | Reseat and solder connections |
| Bad Battery | Weak or no response | Maintain charge levels | Test voltage, replace cells |
| Blown Fuses | Sudden total failure | Avoid surges, use protectors | Swap fuse, check for shorts |
| Sensor Issues | Jerky motion, error codes | Align properly, protect from debris | Test with multimeter, replace |
| Vibration Damage | Gradual degradation | Mount securely, use padding | Reflow solder joints |

Step-by-Step Troubleshooting Guide
I always start with the basics-it’s amazing how often that’s the fix. Grab your tools, and let’s methodically isolate the problem. Patience here pays off big time.
Check the Battery and Power Source
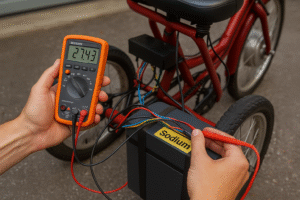
Measure voltage first; it should hold steady under load. A drop below specs signals battery woes. I’ve revived “dead” controllers by simply charging properly.
Reseat connections and inspect for corrosion. Test the charger output too. Faulty chargers mimic controller issues seamlessly.
Inspect All Wiring Connections
Trace every wire for damage or looseness. Use your bike’s diagram for reference. In my experience, color-coded plugs make this easier, but double-check polarity.
Test continuity end-to-end. Replace suspect sections. This step alone resolves half the cases I see.
Look for pinched wires from assembly. Vibrations exacerbate hidden flaws. Secure everything with zip ties.
Test the Throttle and Display
Activate the throttle and watch for voltage changes. No signal? It might be worn. I’ve swapped throttles to confirm controller health.
Interpret display errors-many manuals list codes. Firmware updates sometimes clear glitches. Clean contacts if display flickers.
Examine Sensors and Motor
Hall sensors should output 0-5V as you spin the wheel. Faulty ones cause stuttering. I use a scope for precision, but a multimeter suffices.
Listen for grinding in the motor. Bearings fail independently. Disconnect to test controller isolation.
Check Fuses and Switches
Locate and test fuses for continuity. Blown ones indicate overloads. Replace with identical ratings to avoid repeats.
Switches can stick or corrode. Bypass temporarily to diagnose. Advanced models have programmable settings-adjust via display.
Advanced Diagnostics: Internal Components
If basics check out, open the controller case. Look for burnt spots or bulging capacitors. I’ve repaired some by resoldering, but safety first-discharge caps.
Use thermal imaging if available to spot hot zones. MOSFET testing requires diode mode on your meter. Consult pros for complex boards.
- Essential tools: Multimeter, screwdrivers, wire strippers.
- Safety tips: Disconnect battery, wear gloves.
- If stuck, video your process for reference.
- Common pitfalls: Ignoring error codes, rushing tests.

When to Replace the Electric Bike Controller
Not every issue is fixable at home. If internals are fried, a new controller is wiser. I’ve guided many through this, and it’s often straightforward.
Match voltage, amps, and connectors precisely. Prices range from $50 for basics to $200 for advanced sine-wave units. Installation takes minutes with plug-and-play designs.
Warranty claims cover manufacturing defects. For older bikes, upgrading improves performance. Seek local shops for custom fits.
Consider compatibility with displays and motors. Mismatched protocols cause headaches. Read reviews before buying.
In severe cases like water damage, replacement prevents recurring shorts. I’ve seen partial fixes fail quickly. Invest in quality for longevity.
Preventive Maintenance Tips for Your Ebike Controller
I’ve learned that proactive care extends controller life dramatically. Make these habits routine, and issues become rare. Your ebike will thank you with reliable rides.
Regular Inspections
Examine wires and connections monthly. Look for wear or looseness. I catch problems early this way, avoiding breakdowns.
Clean dust buildup gently. Use compressed air on vents. Tighten screws to combat vibrations.
Protect from Elements
Cover exposed parts during rain. Store in dry garages. I’ve added waterproof bags to vulnerable controllers.
Avoid pressure washing entirely. Wipe down with damp cloths. Sealant on joints adds layers of defense.
Proper Usage Habits
Ease into throttles, avoid max power constantly. Cool down after intense use. Match system components from the start.
Monitor temperature during rides. Apps can help. Overloading uphill invites heat damage.
Cleaning and Storage
Use isopropyl alcohol on contacts biannually. Apply conductive grease. This prevents corrosion effectively.
Store batteries separately in cool spots. Charge to 50% for long-term storage. Regular use keeps everything conditioned.
Additional Tips: Upgrades and Monitoring
Consider heatsinks for hot climates. Firmware updates fix bugs. I’ve upgraded cooling on high-power setups successfully.
Track ride data for patterns. Sudden changes signal issues. Join forums for community advice.
Follow these, and your electric bike controller will serve faithfully for years.