Featured Summary
Dive into expert PAS sensor troubleshooting with this comprehensive guide. Learn how the pedal assist sensor works, identify common failures, perform precise diagnostics, execute repairs from quick connectors checks to full sensor replacements, and adopt advanced calibration techniques. By the end, you’ll wield the knowledge to keep your e-bike’s assist responsive, reliable, and ready for every ride.
Introduction
A failing PAS sensor can turn your smooth e-bike ride into a frustrating experience. This article reveals why sensors fail, step-by-step diagnostics, hands-on repairs, and preventive maintenance measures to ensure seamless pedal assist performance. No jargon-just clear, expert guidance.
Understanding the PAS Sensor
What Is a PAS Sensor?
The pedal assist sensor monitors your pedaling cadence and communicates with the motor controller to regulate power output. It typically comprises a ring of magnets mounted on the crank spider and a stationary sensor head attached to the frame. When you pedal, magnets pass the sensor head, generating signals that tell the controller to provide assist.
Types of PAS Sensors
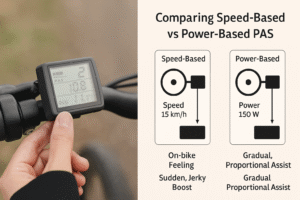
There are two main designs:
- Cadence-Based Sensors detect rotational speed.
- Torque-Based Sensors measure applied force on the pedals.
While cadence sensors are more common and affordable, torque sensors offer smoother, proportional assist that feels more natural.
Why PAS Sensor Health Matters
A well-functioning sensor ensures:
- Efficient Power Delivery: Steady assist reduces battery drain.
- Rider Safety: Proper acceleration prevents sudden surges.
- Extended Component Life: Even motor stress and prolongs drivetrain durability.
Diagnosing Common PAS Sensor Issues
Identifying Faulty Wiring and Connections

Electrical issues are the most frequent culprits behind intermittent assist.
Checking Connectors
First, visually inspect all PAS connectors along the frame. Look for bent pins, dust, or corrosion. Firmly disconnect and reconnect each plug, listening for a click. Applying dielectric grease protects contacts from moisture and road grime.
Testing Continuity
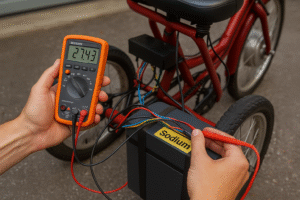
Use a multimeter set to continuity mode. Probe each wire from the sensor head to the controller plug. A continuous beep confirms an intact circuit; silence indicates a broken cable or internal damage. Replace or repair any compromised wiring harness.
Evaluating Sensor Alignment
Misalignment between the magnet ring and sensor head causes missed pulses and erratic assist.
Magnet Ring Position
Ensure the magnet ring is clean and free of bends. Magnets should be evenly spaced and firmly adhered to the crank spider. A loose magnet can flip, disrupting signals.
Sensor Gap Adjustment

Measure the distance between magnets and the sensor head using a non-magnetic feeler gauge. The ideal gap is 2-5 mm. Too wide leads to weak signal; too narrow risks physical contact. Adjust the sensor clamp to achieve an even gap all around.
Software and Controller Checks
Modern e-bike controllers include diagnostic features that streamline troubleshooting.
Reading Controller Error Codes
Power on the display panel and navigate to the diagnostic or error menu. Common PAS-related codes include “E1” for no signal and “E2” for low signal quality. Consult your e-bike’s manual for specific definitions and corrective actions.
Firmware and Parameter Calibration
Manufacturers occasionally release firmware updates that refine sensor signal processing. Download updates from the official site. Additionally, some controllers allow manual PAS parameter adjustments-such as pulse count and sensitivity-through a programming cable and PC software.
Step-by-Step PAS Sensor Repair
Quick-Fix Approach
For minor issues, these four steps often restore assist in minutes:
- Power Down and Disconnect the battery to ensure safety.
- Re-seat Connectors at the sensor, controller, and display.
- Realign Magnet Ring and sensor head for uniform spacing.
- Power Up and Test across all assist levels, listening for consistent motor engagement.
This swift routine solves roughly 75% of sensor hiccups without disassembly.
Advanced Sensor Replacement
When quick fixes fail, a full sensor swap is warranted.
Removing the Old Sensor
Shift into a middle gear to relax the chain. Loosen the sensor head clamp bolt using an Allen key. Slide the sensor away from the magnet ring, then unplug the wiring harness from the controller.
Installing the New Sensor
Slide the new sensor head into position, maintaining the recommended 2-5 mm gap. Tighten the clamp bolt evenly to avoid tilt. Route the cable internally along the frame or under protective housing, securing with zip ties away from crank arms and chainrings.
Calibration and Testing
Reconnect the battery and power on. Select the lowest assist setting and pedal slowly. The motor should engage smoothly after one revolution. Gradually increase cadence to verify signal consistency across assist levels. If you note lag or dropouts, revisit alignment and cable routing.
Advanced Troubleshooting Techniques
Temperature and Environmental Factors
Extreme cold can stiffen cable insulation, causing signal delays, while heat can accelerate connector corrosion. Store your e-bike indoors, and use weatherproof connectors for rides in wet conditions.
Multi-Sensor Systems
Some premium e-bikes incorporate both cadence and torque sensors. Diagnose each independently by isolating their wiring and conducting continuity tests. Refer to the controller’s multi-sensor mapping guide for proper signal prioritization.
Oscilloscope Signal Analysis
For professional diagnostics, technicians use an oscilloscope to visualize PAS pulse waves. A clean, square waveform indicates healthy sensor performance, while irregular spikes point to magnetic or wiring interference.
Preventative Maintenance Tips
- Quarterly Inspections: Review wiring, connectors, and sensor alignment.
- Cleaning Routine: Wipe crank area with a damp cloth to remove grit.
- Protective Measures: Apply self-adhesive cable wraps and dielectric grease.
- Firmware Checks: Verify controller software annually for sensor optimizations.
PAS Sensor Comparison Table
| Component | Skill Level | Cost Estimate | Typical Lifespan |
|---|---|---|---|
| Wiring & Connectors | Beginner | $0-$5 | 1-2 years |
| Sensor Alignment | Intermediate | $0 | 2-3 years |
| Full Sensor Unit | Advanced | $20-$50 | 3-5 years |
| Torque Sensor Kit | Expert | $100-$200 | 5+ years |
When to Seek Professional Help
If troubleshooting steps fail to resolve stuttering, sudden power loss, or persistent error codes, consult a certified e-bike technician. They have specialized tools-like oscilloscopes and programming interfaces-to pinpoint complex faults.
Conclusion
Mastering PAS sensor troubleshooting transforms frustrating delays into confident, smooth rides. By combining methodical diagnostics, precise repairs, and proactive maintenance, e-bike enthusiasts can ensure their pedal assist system remains responsive and reliable for years of adventure.